SIMBAD Table Upload Example
Upload a table of AE stars generated from SIMBADGet a list of Ae Stars from SIMBAD
Target lists must adhere to the formatting rules required by KOA. Arguably the simplest format is a comma-delimited list: target name, RA, Dec. The following describes how to generate this table.
As an example, let's say you are interested in Ae stars.
- Go to the SIMBAD database (the U.S. mirror at CfA/Harvard is at: http://simbad.harvard.edu/simbad/).
- There are many ways of performing the following steps; we will show only one of them.
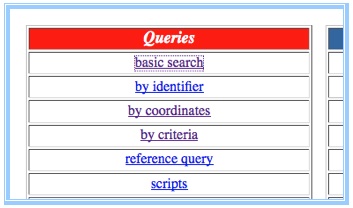
- First, click on "Basic Search" under "Queries". This is solely to get to a screen that allows access to the output options. If you type in search criteria before you set up output options, you may have to retype the criteria after you save the new options.
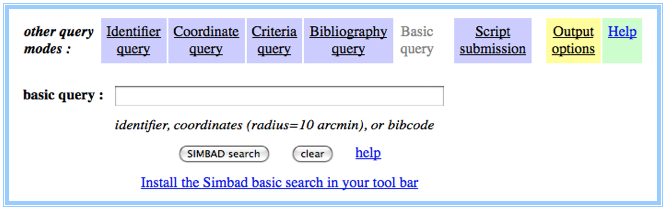
- Click on "Output options" at the top right (yellow background in the figure below.)
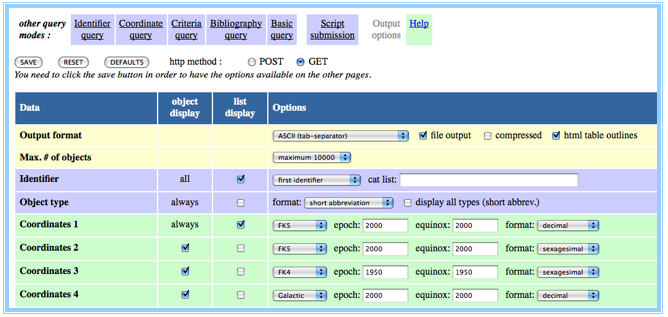
- On the subsequent page, on the row labeled "Output format" select the "ASCII (tab separator)" type. Make sure "file output" is checked.
- Under the column labeled "list display" make sure only the following are checked: Identifier, Coordinates 1. On the line "Coordinates 1", select FK5, epoch 2000, equinox 2000 and decimal format.
- Click "SAVE" towards the upper left to save these preferences.
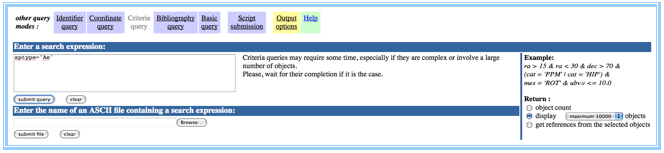
- Now click on "Criteria query"
- On the subsequent page, under "Enter a search expression", type:
sptype=Ae
- On the right side under "Return:" select "display" and at least 100 objects.
- Click on "submit query" under the search criteria.
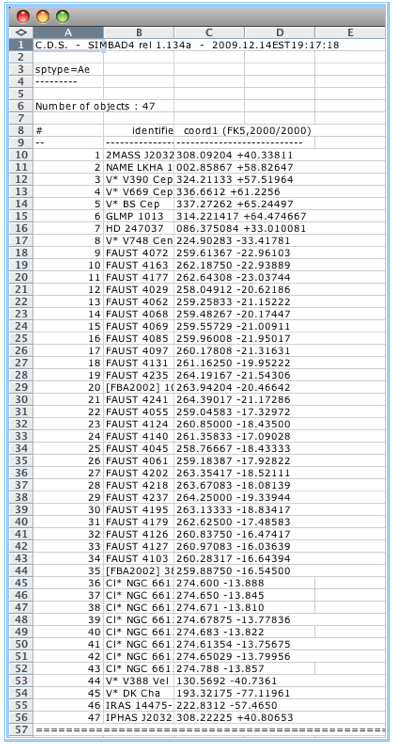
- This should return a file listing ~50 objects. Depending on your local browser settings, you may be asked to save this file, or open it with Excel or some other program. (For a tab-delimited output from SIMBAD the file extension will be ".tsv" .)
Format the list properly
- Let's assume that one way or another you open this table within Excel. You should see some rows at the top with header information, and three columns: a sequential integer (1-47, or however many targets there are), and a single column containing both RA and Dec in decimal form.
- To convert this to a compatible format:
- Delete the sequential integer in the first column. In Excel, this should normally delete some of the information in the header (rows 1-7 in the figure) and at the bottom of the table (row 57 in the figure.)
- Remove any remaining header lines and/or lines at the bottom that are not part of the table of target names and coordinates. Normally, once the leftmost column is removed, this will only be the table column headings (rows 8-9 in the figure).
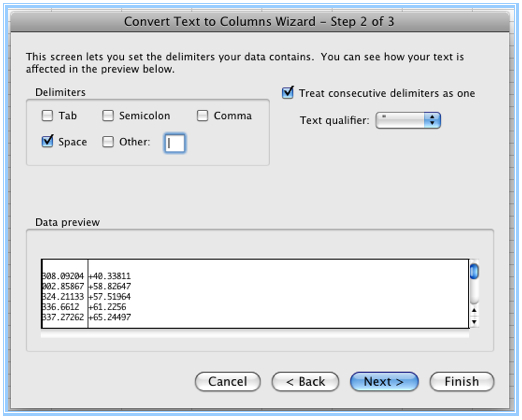
- Extract the RA and Dec separately into two columns. (Again there are many ways to do this within Excel.) Under the menu titled "Data" there is a "Text to columns..." option, which will bring up a dialog box:
- select "Delimited" and click on "Next". Another dialog box will replace this one:
- Select the delimiter "Space" and make sure that the small table below properly separates the RA and Dec. Then click "Next". In the third dialog box click "Finish". Confirm that the RA and Dec are now in two separate columns.
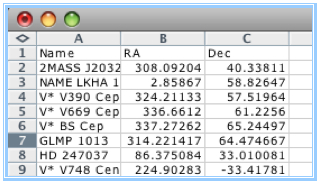
- Add a row at the top of the table with the column labels "Name" "RA", and "Dec".
- You should now have three columns: Name, RA, and Dec, the latter two in decimal format (below).
- Save this file as a comma-delimited file (CSV). However, do not use the ".csv" extension; rather specify the extension ".txt". This is to avoid Windows insisting on treating this as an Excel file. Will call ours "Ae.txt". You can download a copy of this text file here.

Upload the table to KOA
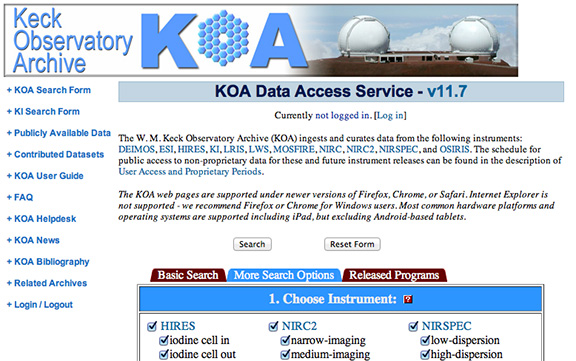
- Point your Web browser to the KOA user interface at https://koa.ipac.caltech.edu/cgi-bin/KOA/nph-KOAlogin and select the "More Search Options" tab.
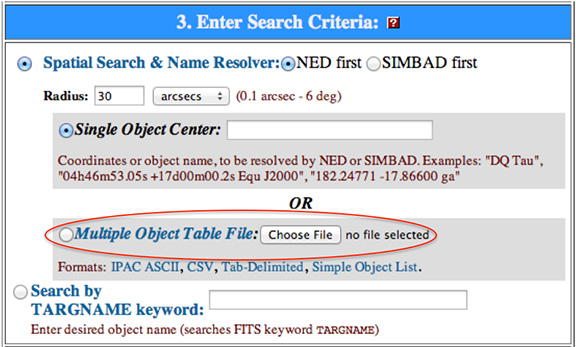
- In the subsequent page, under "3. Enter search criteria" you will see a radio button for "Multiple Object Table File". Select this and click the adjacent "Browse" button.
- In the subsequent dialog box, navigate to and select your target list.
- Click the "Search" button on the KOA interface (towards the top or the bottom).
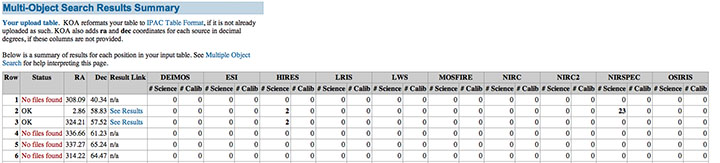
- If all has gone well, you will see a results table that lists each row of your table and whether there are any data on that target in KOA. In our case only two objects had data. We clicked on the first one (row 2) on the "See results" link.
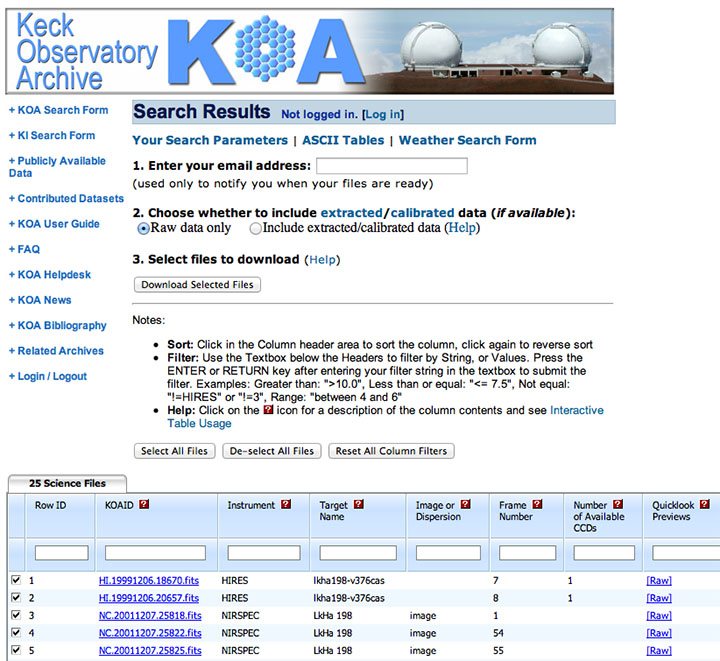
- The "See results" link will take you to the normal search return page of KOA.
- You can now select and download your files as you would if you had searched the archive for that specific object.
Please acknowledge the use of KOA by including this text in your publications:
This research has made use of the Keck Observatory Archive (KOA), which is operated by the W. M. Keck Observatory and the NASA Exoplanet Science Institute (NExScI), under contract with the National Aeronautics and Space Administration.
Please also acknowledge the PI(s) of datasets that have been obtained through KOA, and please contact the KOA Help Desk if you publish archival data.
If your research uses data reduced by the DEIMOS, KCWI, MOSFIRE, or NIRES PypeIt DRP, please use the PypeIt Citation.
If your research uses data reduced by the KPF DRP, please use the citation as described in the README.md.
Privacy Policy Image Use Policy
The Keck Observatory Archive (KOA) is a collaboration between the NASA Exoplanet Science Institute (NExScI) and the W. M. Keck Observatory (WMKO). NExScI is sponsored by NASA's Exoplanet Exploration Program, and operated by the California Institute of Technology in coordination with the Jet Propulsion Laboratory (JPL).